Introduction:
The time has come!
With the arrival of your new BDSMDIY.com Bed Playground System (BPS), you are now tasked with the assembly of your lovely new toy! The time required to assemble the system can vary widely, with a seasoned expert taking less than 2 hours and a beginner taking 6-8 hours.
Regardless of which category you fall into, we suggest you start by calling a friend or partner over, making a healthy snack tray, putting on something sexy (but still somewhat protective), and assigning someone to be the boss. Paddles and/or riding crops are optional 😉
Have questions along the way? Don’t hesitate to contact us via Twitter or email us at support@bdsmdiy.com! We can provide you with a Telegram or WhatsApp contact so we can give you real-time help.
What you’ll need:
- Appropriate safety gear (expect risks like falling structural members, potential for pinching between structural members, physical strain from lifting structural members or tightening fasteners, etc)
- 1/4″ ball end Hex Allen Key
- Tape measure
- A sturdy step-ladder
- A pair of gloves (optional)
- A bowl or two to hold fasteners, tools, and other small parts (optional)
- The oh-so-important snack tray (optional but highly recommended)
Items needed to complete your DIY BPS (not required for initial assembly):
- Movable Anchor Points
- Movable/fixed metal loops ~$20-40 (see How to: Movable Bolted Anchor Points for more ideas)
- Movable slings ~$40-50 (see How to: Webbing Slings for Custom Suspension for more ideas)
- Mattress to fit chosen bed size
- Box spring OR 2 plywood mattress supports – 80″ x 30″, one for each side (recommended plywood thickness of 3/4″ or 19mm, minimum thickness of 3/8″ or 9mm)
- Any suspension equipment or restraints
- Bedding
- Headboard / Footboard – (while not required, there are many ways a custom headboard or foot board can be attached and incorporated into the bed, see How to: Adding a Headboard, Footboard, Cladding and Upholstery for ideas.)
Important Points to Remember During Assembly
- Be careful of your roof and walls: The metal corners of these parts can damage and scar your room – take care as you move these around to prevent damage.
- DON’T OVERTIGHTEN! These fasteners do need to be tightened well, but if you overtighten you can strip the threads, ruining a fastener (if using anchor fasteners) or stripping a tapped thread (if using end fasteners).
- When tightening, it’s best to insert the long end of the Hex Allen Key in the fastener to spin it snug. Then tighten it fully later by inserting the short end of the Hex Allen Key. Using your hand on the Hex Allen Key is more than enough, so don’t be tempted to use a tool longer than the tool provided. Using anything longer or that allows you to use more torque can strip and damage the fastener or the bed system.
- An anchor fastener is replaceable, but if a tapped structural member is stripped, you’ll likely have to replace the whole structural member. If this happens, don’t fear, you can probably find a compatible replacement for a reasonable price locally. Let us know if this happens and we can help you find what you need.
- Assemble sections systematically: You’ll find that some parts need to connect before other parts. Despite how much you might not want to follow the instructions (you little brat, you), we suggest at least assembling parts in the sections listed below.
- Start with the lowest parts first: The lower the parts, the lower the chance of dropping a part or something falling on you. Start low and build up! You can also build upright sections on the ground, then raise them up to fasten them in place.
- Take your time and enjoy the process: Lets be real, this bed system will present endless fun. Don’t rush the process! Instead, take your time and admire the simplicity of how it works. Soak in the vast variety of what you can do with it once it’s together. This is your time to learn and become intimately engaged with your new bed!
Step 1: Inventory Your Parts and Tools
The key to making this fun is to have everything you need ready to go. First, lay out all your parts. Measure and use tape to label parts according to the diagram. Nothing prolongs the process like having to undo some of your work, but we’ll be honest – it’s happened to the best of us more than we’d like to admit 😅 Note that pieces A and D are identical and interchangeable and will be referred to as D, and pieces G, H, and I are interchangeable and will be referred to as G.
Once you know you have all the parts, we suggest moving them out of the room into the hallway so you don’t have to trip over them while building. If space is limited, lay the parts all to one side, so you can assemble sections on the floor.
If you don’t have all the parts, contact us right away.
As you assemble, tighten fasteners just snugly. As you put things together, you’ll find they will need little adjustments for new parts you attach. Once everything is together, you can loosen each one, then tighten it fully when you know it’s properly aligned.
Step 2: Assemble the Foot Section, Then the Head Section
Because this bed is identical from head to foot, you can follow this step twice to assemble the head and foot sections.
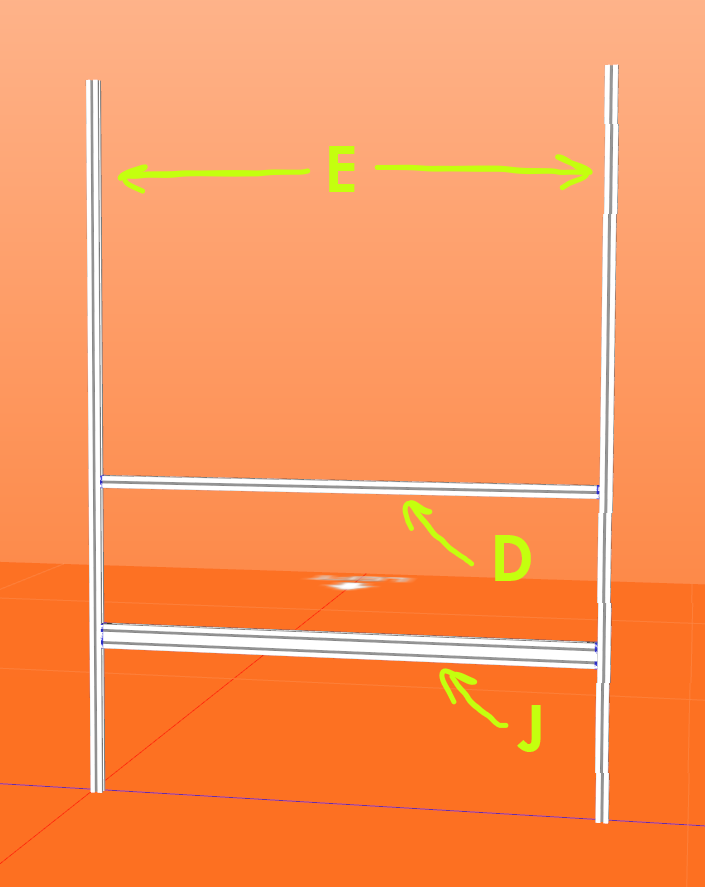
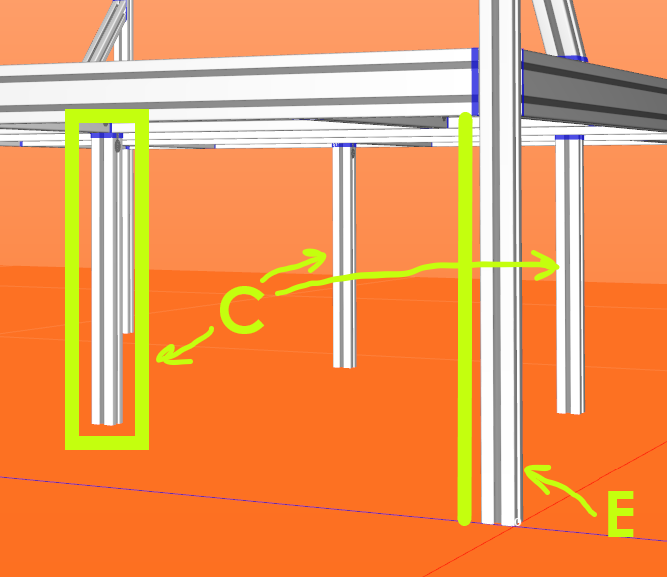
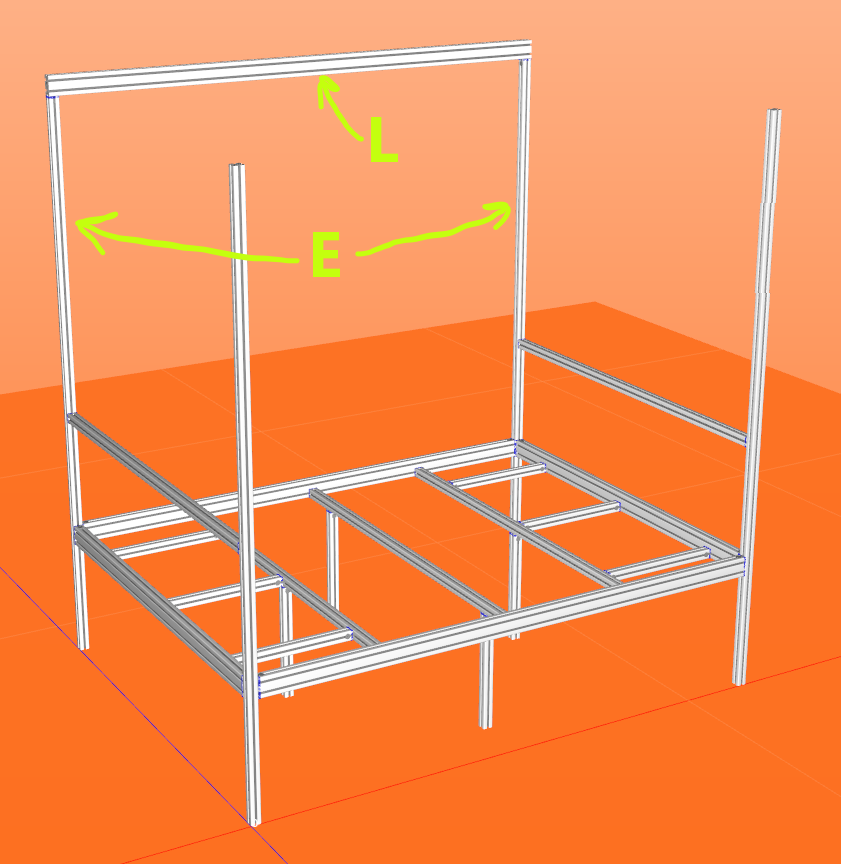
As shown in figure 1, lay an E on the floor. Find and lay a J and a D perpendicular to the E. Find a second E and lay it opposite the first E. Depending on the height of your bed platform (the height you selected when purchasing your BPS), you’ll need to measure where J and D connect to the E‘s. Using a C (figure 2) is a quick and simple way to measure from the floor to the bottom of where J connects to E. Remember that it’s easy to adjust these later, so snug them up but we wait to tighten ours up all at once toward the end of the build.
Take an end fastener and slide the small, rectangular end into the slot in one of the E sections. Now, with the end caught in the t-slot, slide the circular end of the fastener into the round hole in J. We usually recommend orienting these so they are out of sight – so facing up for ones above eye level and facing down for ones below eye level. Use the hex Allen Key to tighten the connector. Voila! You now know everything you need to know to put the rest together!
Following this diagram, construct two of these sections and lean them up on the wall out of the way.
Step 3: Assemble the Bed Base Supports
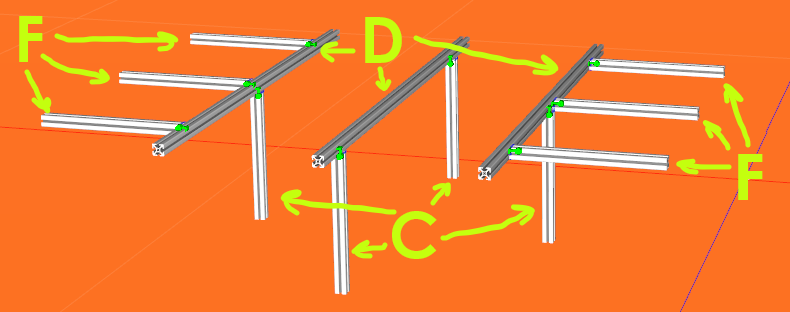
The bed base supports include three D‘s, four C‘s, and six F‘s as shown in figure 3. These will all eventually attach to K and J as shown in figure 4.
Start by assembling the center support bar with one D and two C‘s. The C‘s should be approximately 6-8″ from each end.
Next, assemble the first of two end support bars using one D, one C and three F‘s. Note that C and the F‘s should be perpendicular (90°) to each other. C will touch the ground and the F‘s will eventually connect to a J on each end of the bed. The center C and F should be exactly on center of D and the two other F‘s should be approx. 8″ from either end. Repeat this step for the other set of D, C, and F‘s.
Step 4: Connecting the Head and Foot Sections
Ok, now things get a little more involved. An extra set of hands will make this much easier, but it can be done on your own if you are careful.

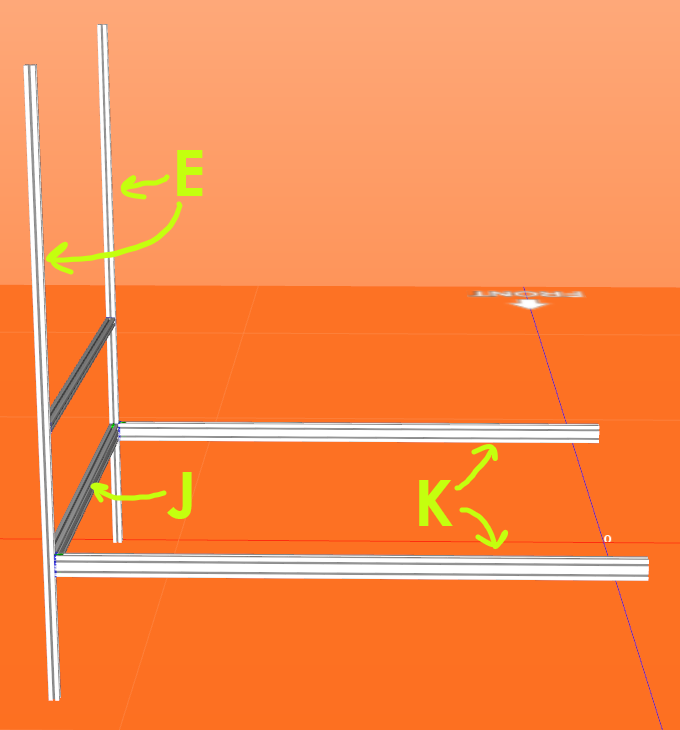
Connect K to E on the headboard section where J meets E, as seen in figure 4. These will form the base of the bed platform and will hold the mattress in place (unless you’re getting REALLY rowdy). You can do this on your own by balancing K on your knee while the head section leans safely against the wall. Once K is tightened to E, you can rest K on the ground. Now do this for the other K. Do this a third and fourth time with the foot section being connected to K where J meets E.
You now have a wobbly four post bed (figure 5)! Don’t worry, as you add the rest of the pieces, the structure gets much more rigid.
Step 5: Connecting the Overhead Suspension Rails
This is another place where an extra set of hands will make your life infinitely easier. A sturdy step-ladder (or chair in a pinch) is also very handy (maybe even essential) for this step.
Find yourself the two L‘s (they are a few inches longer than the K‘s). While one person holds an L on the top of the E‘s (bridging from an E on the head to an E on the foot sections), have the other person connecting the end fastener on each end. Don’t let go of the L until BOTH sides are attached and snug. L is heavy enough that it can hurt you. Each end of L should be perfectly flush with the outside edge of each E. Do the same for the second L.
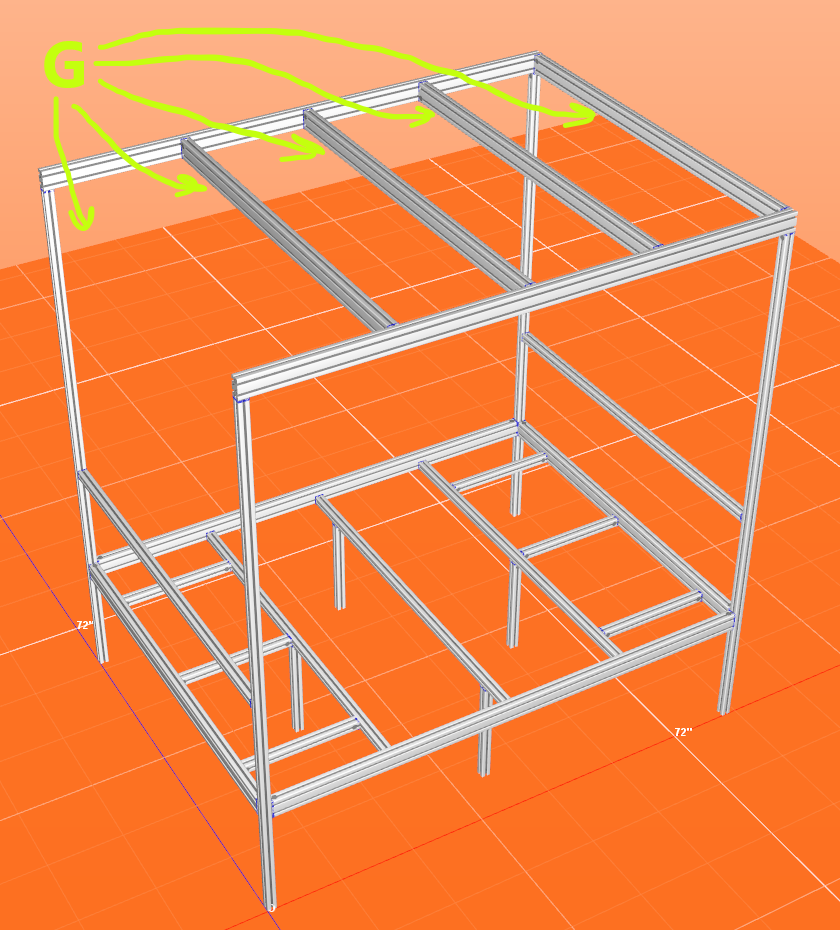
With both L‘s in place, find the five G‘s. One at a time, have one person stand on the step ladder while the other attaches both ends of a G, from one L to the other L as seen in figure 6 (showing four of the five G‘s installed). Repeat this for the other four G‘s. You can position the three center G‘s evenly, or slide them into a specific position to adapt to your playground needs.
Step 6: Install the Bed Base Supports
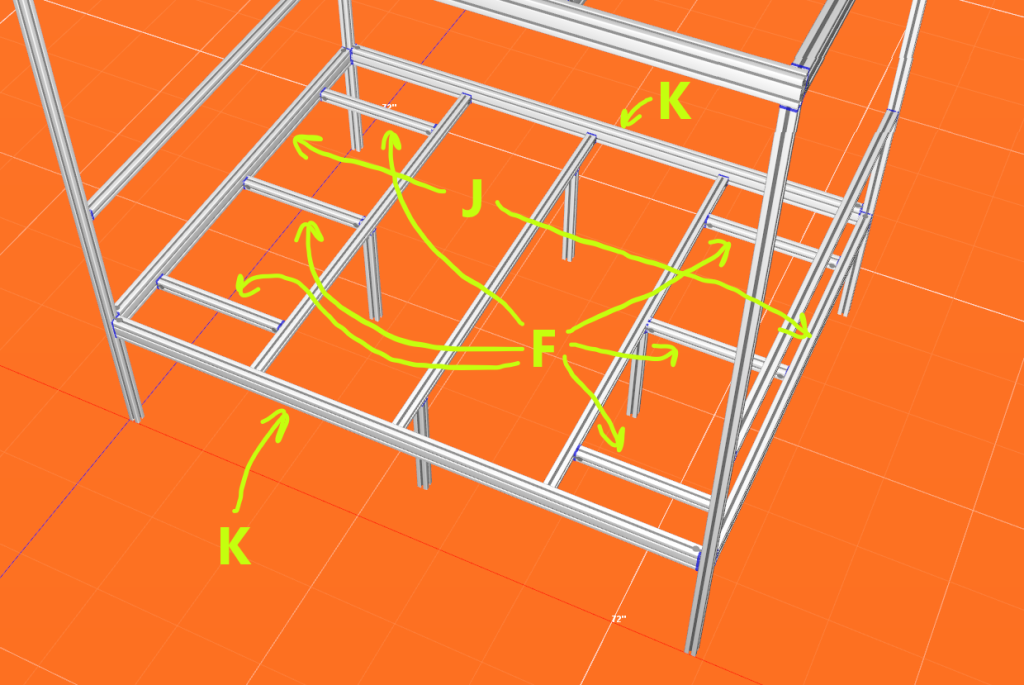
Using the parts from Step 3, insert and install the fasteners for each of the three bed base supports, connecting each side of a D to its respective spot on K. (NOTE: If your C‘s seem too tall to fit between D and the ground, see Step 7). Attach each F to J in the same manner.
Ensure the center D is EXACTLY on the center of K. If it is not, then your plywood base from the next step will not stay up. Keep the fasteners a little loose until all of one section are in place. Then lightly snug up each one. Now one at a time, loosen a specific fastener connecting F to J and then tighten it. This will allow the fastener to center naturally to its relaxed position. Repeat this for every fastener connecting to all J and K ensuring each C is vertical and touching the ground.
Step 7: Equalize your Bed Base
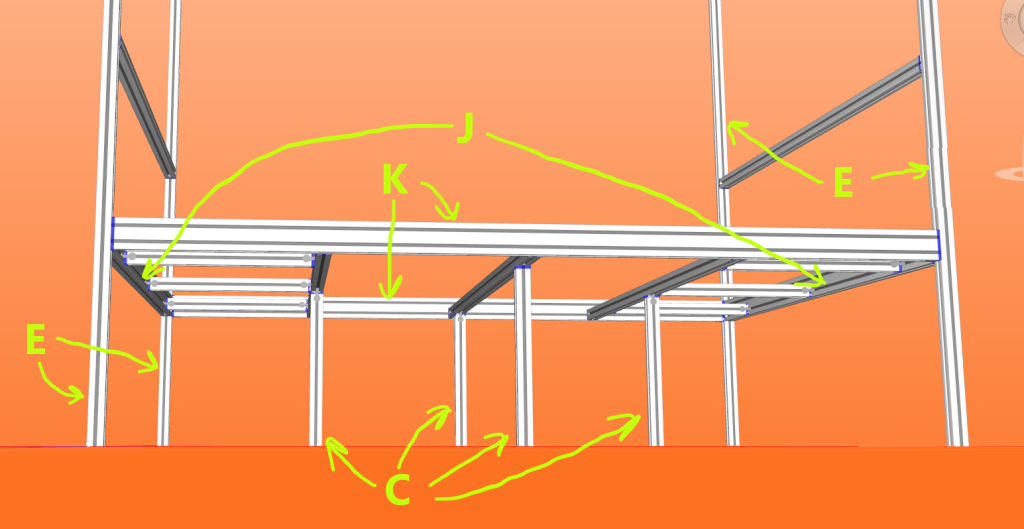
If your C‘s are not touching the ground, then your J and K‘s are too high.
If your C‘s are touching the ground, but your E‘s are not, then your J and K‘s are too low.
You can equalize this by loosening the J and K‘s where they attach to the E‘s. If you loosen all of those points and wiggle them around, you should be able to get everything to equalize nicely as shown in figure 8. Once equalized, you can tighten all fasteners from J and K down. If your overhead suspension rack is also assembled well, you can tighten all the fasteners from J and K up.
Step 8: Install the Optional Angle Supports
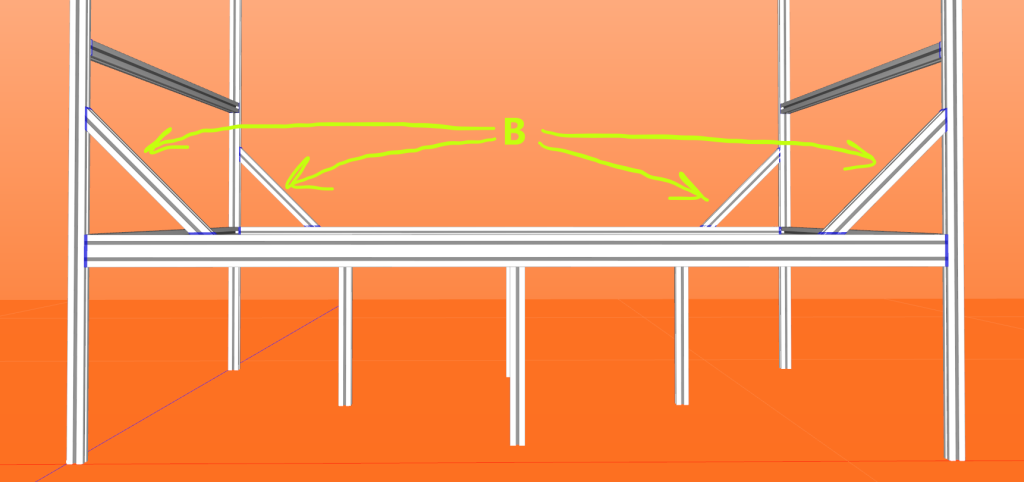
Support B serves two purposes (shown in figure 9):
- To provide upper or lower tie supports: Want to tie a hand to each upper corner? Then use these upper corner mounts to tie to!
- To provide a bit more rigidity to the bed if flexing under repetitive motion: Sometimes the rhythm between two people can get the bed-a-rockin’ – these supports increase the rigidity of the bed if this effect is not desired.
These can be installed and uninstalled independently of the rest of the BPS.
Step 9: Install Plywood Base or Box Spring
The final step is to cut and place the plywood mattress base or box spring.
We recommend a good quality 3/4″ plywood, cut into two sections (one from the headboard to the center, and one from the center to the footboard), sanded, and painted/stained, but a box spring works equally well (but adds extra height). Be sure the plywood is cut with approximately 1/8″ of gap – any more and your base may slip off the center support.
Most hardware stores will cut plywood accurately for you in store for a buck or two per cut. We recommend taking your measurements, writing them down, and then asking the store to make the cuts for you on their large saws. It will save you from crooked cuts and getting sawdust in your nooks and crannies!
Conclusion:
Congratulations! Throw your mattress on top, add some bedding, and your Bed Playground is ready for play!
Next, you will need to get your accessories together (see items at the top of this page) or read some of our other articles to see what you can do to spice it up even more:
- How to Guide: Mastering Movable Bolted Anchors for the Bed Playground System
- How to Guide: Adding a headboard, footboard, cladding or upholstery to your furniture
- How to Guide: Slinging Sensuality – A Playful Guide to Using Webbing Slings
Have questions? Don’t hesitate to contact us via Twitter or email us at support@bdsmdiy.com! We can provide you with a Telegram or WhatsApp contact so we can give you real-time help.
Disclaimer:
This guide is intended for entertainment purposes only. Please follow the manufacturer’s instructions and take necessary safety precautions when working with extruded aluminum and fasteners. If you build these designs, you accept all the risks associated with the use of the final assembly.